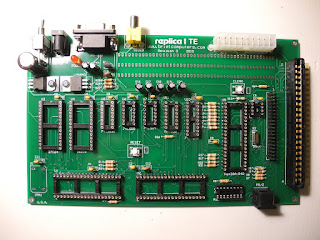
I recently built a Replica 1 computer kit. I've been having a lot of fun with it doing some retro computing, so I'm going to blog some of my experiences here.
The Replica 1 is a recreation of the Apple 1, the computer that started Apple computer as a company. The Replica 1 is not an exact copy, as the original Apple 1 used a number of components that are now hard to obtain and was quite complex. The Replica 1 uses some modern components, but the same 6502 processor and is compatible enough to run software written for the original Apple 1.
You can read about it in detail, but briefly, the key features are:
- a 6502 processor with 32K of RAM
- 8K of ROM containing a machine language monitor and BASIC (written by Steven Wozniak) and an assembler/disassembler/debugger
- support for an ASCII keyboard (like the Apple 1) or a modern PS/2 PC keyboard
- composite video output to a television or monitor
- a serial port that allows transferring files to a computer
- an Apple 1 compatible slot and expansion connector
You can buy it assembled or as a kit. I chose the kit version. Assembly was quite straightforward. I'm an experienced kit builder but there is nothing particularly challenging about the kit as it has no surface mount components and the instruction manual is very well written. Below is a picture of all the parts in the kit organized and ready to start assembly.

Here is the board assembled but no ICs yet inserted in the sockets:

And here is the board with ICs installed being powered up for initial testing:
I used a PS/2 keyboard as ASCII keyboards are very difficult to find these days (the most common source would be to take one out of an old Apple 2 computer). I had a suitable DC power adaptor although I also tried it with an ATX style PC power supply (which is much larger).
For video output I tried it with both a television and an old Commodore 1702 monitor. The Commodore monitor was a little better quality and more authentic.
All ICS are socketed. I followed the recommended procedure of first testing all the power supply voltages before installing the ICs. Then I installed the Propeller chip and EEPROM to verify the video output. At this point I had one problem - there didn't seem to be any video output. Eventually I realized that the EEPROM for the Propeller chip was not the large 28C64 EEPROM, it was the little 8-bin 24LC256 chip. Once I installed the right chip, the Propeller chip loaded it's code and displayed the "@" prompt. Next I installed the 6502 and remaining chips and the machine language "Woz" monitor came up, allowing me to examine memory.
I had one other issue - my kit was missing the 1 MHz crystal oscillator used for the 6502 processor. An e-mail to Vince Briel had one of these on its way in the mail, but in the mean time I built a crystal oscillator circuit on a breadboard using a TTL chip and a 1.4 MHz crystal I had in my junk box. You can see it in the picture below.
In future blog postings I will talk in more detail about some of the interesting hardware and software available for the Replica 1 as well as some of the software I've written and experimented with.
Finally, in researching the Apple 1 on the Internet I came across the web site signedbywoz.com that sells pictures and other memorabilia signed by Steve Wozniak, the designer of the Apple 1 and Apple 2. I just had to have one of these items for my "man cave" where I work with computers and electronics. I ordered a signed Apple 1 schematic. Here is a picture of it framed on the wall.
References:


No comments:
Post a Comment